Google Apps is one of the most disruptive technologies currently available today. It has ushered in a new era of doing business online, with collaboration reigning as the new king. It has forced Microsoft and IBM to release “Live” versions of Microsoft Office and Lotus Symphony. Google has a big head start though, so it will be interesting to see how Microsoft and IBM can compete.
Google Apps took a major step forward when Google announced Google Apps For Business. This service allows your business to use the power of Google’s cloud-based service for your own business. I recently went through setting up Google Apps for a startup company I’m part of, and so I’ll be doing a 2-part story on the set up, catches, and experiences I had with it.
One thing to note before we start: I set up the free version of Google Apps. This is basically the same set up as the Business version except it’s missing a few items that are more geared for the enterprise. These include Blackberry & Microsoft Outlook integration, forced SSL, custom password strength requirements, an SLA, support, and a few other goodies.
The only feature SMBs could possibly use is the 25 GB per user in Premier, versus the standard 8 GB in standard Google Apps. In my own experience, my primary Gmail account uses 2.3 GB worth of storage, and I have had Gmail since it was in private beta. Your mileage will vary depending on your email dependence, but its a safe assumption that most people do not need more than 8 GB of email space.
Things to Know Before You Start
There are some items you need to have sorted out before you get started. Probably the most important is the DNS for your domain. The more control you have over the DNS of your domain, the better. If you don’t own a domain, that’s fine. Google will walk you through purchasing a domain and you will wind up on Godaddy for a domain registrar, which will provide sufficient DNS access.
My domain was pre-existing and hosted on 1&1. 1&1 has probably the most annoying DNS configuration tool I have ever used. It only allows for one change to happen at a time on a domain. Why does that stink? Google Apps has at least five customizable URLs that you can (and should) set up later in the process. Mail, Calendar, Docs, and several other apps include the ability to customize their URL to use subdomains off your domain. Having to wait for each single CNAME change can extend the time required to deploy, and it’s frustrating to have to keep checking to see if the change was posted.
If your domain is hosted on a similarly mediocre registrar, you can always get DNS hosted elsewhere, but it usually costs extra. Godaddy is probably the best cheap option for domains. Network Solutions offers a ton of services, but their domains are rather expensive because of it.
Next, are you going to do a pilot or a one-time switch? A pilot deployment requires setting up a test domain, and allocating users to test. Furthermore, you can go really in depth and set up split delivery so mail goes to both the Google account and the production email domain. This requires different set ups for different mail servers, and most SMBs will probably just want to do a one-time switch over.
Finally, read this guide all the way through, and all the Google documentation. Most people I’m guessing are working with production domains already in place, so reading through all the documentation you can will be important. Otherwise, you can expect late nights and angry users as you muddle your way through setting this up.
Step 1: Account Creation
Creating a Google Apps account might seem like a no-brainer, but there are a few important items to deal with when you do this.
First of all, who is going to be the master account holder? Generally for smaller businesses, this is one of the founding members who is in charge of the IT. For slightly larger businesses, this might be someone the IT administrator. For medium-sized businesses, this might be a CIO type who would then create other administrators to handle the daily operations.
While the administrator account isn’t terribly difficult to change, its important its set up to go to the correct person. This person will receive all service communications, including payment notifications, and any opt-in subscriptions.
In my case, I am the founding member managing the IT, so my account is also the domain admin.
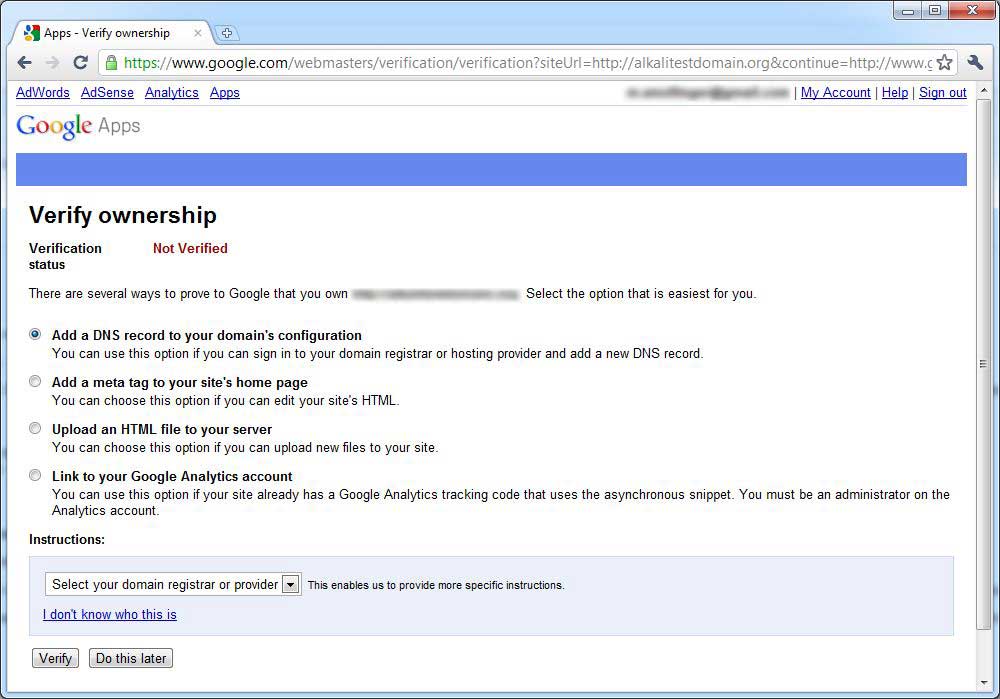
When you set up an account, you will have to verify you own the domain. There are a number of ways to do this, and depending on your existing set up are different. I could not, for example, add the proper TXT DNS records, so I had to download a file Google generated for me, and upload it to my web server.

Options available to for domain verification.
Once there, I navigated to the file, which ran a verification script and notified Google that I owned the account. Other options include adding meta tag entries to your existing html if you can edit html, or linking the new domain into your Google Analytics account if you already have one. Overall I would recommend the web file upload process since it requires messing with the least amount of settings.
Step 2: User Account Creation
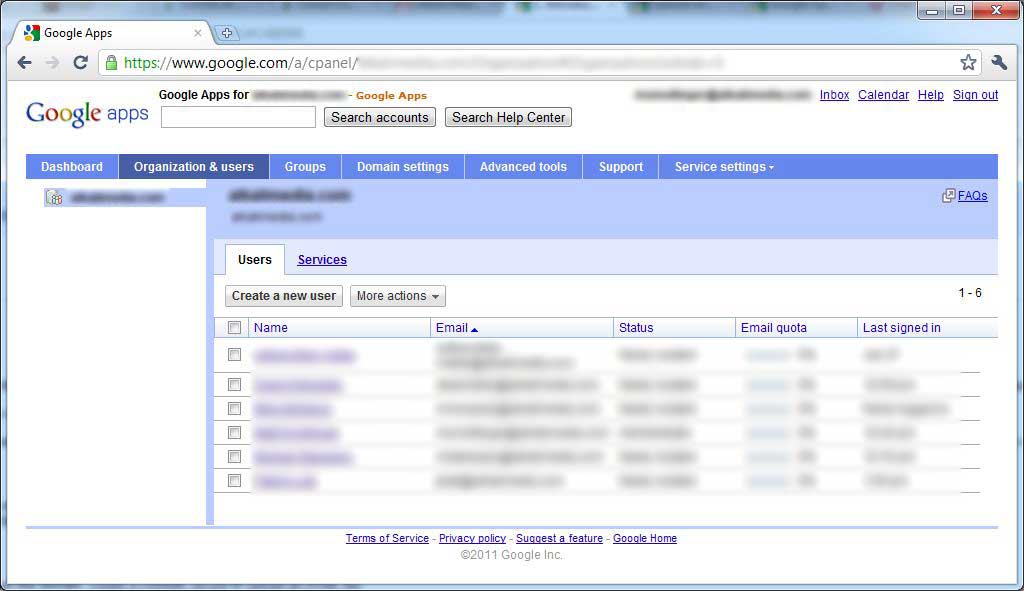
User account creation is quite simple, and supports a few import methods. Users can be created via the control panel in the website. This is where you will set up your test users, and will be where you do all account management from. Get familiar with it, because it’s an important place.

Screen shot of the organization and users control panel. From here you manage all aspects of the accounts on the domain.
Second you can choose to do a CSV import. Businesses with over ten users will probably want to use this option, as its much faster to create a CSV file than it is to spend about three minutes per user using the control panel.
Finally, if you’re looking at importing over 500 users at once, you will have to use either multiple CSV imports as they are capped at 500 users per import, or the Import API. The Import API will require custom code to be written, but allows for integration into Active Directory and other local user control products.
My recommendation is to use the CSV import unless you have under five users. When you go to set these up, make sure to check the box “Require a password change” so that your users will be forced to make up their own password.
Step 3: Accessing your Apps
Apps access is important. If people don’t have easy access to Mail or Calendar, you will hear about it very quickly. Thankfully, you can customize the standard URLs to match your current URL scheme.
By default, all apps can be accessed via a standard URL scheme. For example, http://mail.google.com/a/your-domain.com will open the Gmail app for your-domain.com. Calendar, Docs, Sites, and the Control panel work the same.
Google offers customization options via DNS that allow you to map a custom URL to a particular app. This would allow http://mail.your-domain.com to access the Gmail app for your-domain.com.
Setting up custom URLs requires being able to set up CNAMES in your DNS. CNAME stands for Canonical Name, and basically tells a DNS server that anytime someone requests this domain name, send them to a different domain instead. It’s not the same as a redirect because the far-end server needs to know to respond for that original domain name.
Second, we have to set up Google to know what the domain is it should respond to. In the control panel, under Service Settings, you select which service you want to set up a custom URL. One the newly opened page, the first selection allows you to change the URL.
It’s important that you give yourself enough time when doing DNS changes. DNS changes take hours to propagate across the Internet. This is a vast improvement from when it used to take days! But you still have to wait some time if you mess something up, just because of how DNS works.
Web Address Mapping is the same thing as Custom URLs, except it’s specific to Google Sites. This is where you can use Google Sites to host your web page. Honestly though, Google Sites is very limiting when it comes to designing a nice website, and I would recommend getting a simple hosting account instead from whoever your domain provider is.
Google Sites can make sense for simple internal company sites, however, and web address mapping will make it so that you don’t have a super long URL to access a particular site.
Step 4: Setting up Mail
Email has revolutionized communications, and is lauded as the single most disruptive technology of our time. Thus, it’s extremely important that it is set up correctly, or else you will become the most disruptive force in your company!
Email is where another fork in the road sits. One-time switch companies can choose to modify their MX records and just repoint all email traffic at Google. This is the easiest path, and the one I took with my startup. However, do NOT change the MX records at this point. We still haven’t finished configuring everything, and you should read through the rest of the guide here and Google’s docs before making the complete shift.
The other option is dual or “split” delivery. This option is useful when you are pilot testing Google Apps and have a working system in place already. I won’t go into detail as the set up is different for every existing system. Google provides a number of guides like this one for Exchange. Others exist in Google’s documentation for different mail servers.
The next decision point is whether you have multiple domains you receive email on. For example, I might receive email on mydomain.com and domain.com. Being able to receive email on multiple domains to a single account is useful for many internet-oriented companies, so Google provides a “Domain Alias” feature.
If you plan on adding a second domain, you will have to go through the same validation process as I mentioned in Step 1. Make sure you have the proper access to the second domain in order to complete the validation.
Gmail has a Labs feature which provides a number of beta options. Features included are: Offline Gmail (uses Google Gears), Tasks, Message Translation, and other neat items. You can choose to enable or disable this feature. Most people I would say should disable it, unless your user base is technically savvy (and they might be the worst offenders!)
One of the issues with moving to Gmail is the concept of mailto: links. Mailto: links are special HTML links that tell a web browser to open an email program. Generally mailto links are opened by your local mail client so you can quickly type up an email. How do you handle getting this email link into Gmail?
Google’s answer is using Google Talk. Google Talk is Google’s chat client, and can proxy requests for mailto links into Gmail by opening a web browser and doing some Javascript magic. Additionally you could install the GMail Notifier, but that hasn’t been updated recently and Google Talk is the currently recommended way.
For our needs, installing Google Talk was fine as I’d say 75% of our day is spent working in a web browser. Therefore Google Talk will cover most of our encounters with mailto: links.
Conclusion
That wraps it up for part one. We went over initial account creation and verification, user creation, and finally setting up your domain and Gmail to receive email for your domain. Stay tuned for part two where we go through the rest of the set up, launch the service, and determine how to support and expand moving forward.
