| At a glance | |
|---|---|
| Product | NETGEAR ProSafe Wireless-N 8-port Gigabit VPN Firewall (FVS318N) [Website] |
| Summary | 8 port router with Gigabit Ethernet ports, 2.4 GHz b/g/n AP and built-in 12 IPsec and 5 SSL endpoints. Includes service QoS, up and down bandwidth limiting, session limiting and traffic metering. |
| Pros | • Gigabit ports with VLANs • SSL and IPsec VPN • Supports L2TP for Win 7 native client VPN |
| Cons | • Relatively slow routing speed • Slooww admin interface • Jumbo frames on only some ports • Difficult L2TP client config |
Typical Price: $0 Buy From Amazon
Introduction
NETGEAR has improved its FVS318 Firewall/VPN appliance since we reviewed the FVS318G in 2009 by adding wireless capability, increasing performance, improving features.
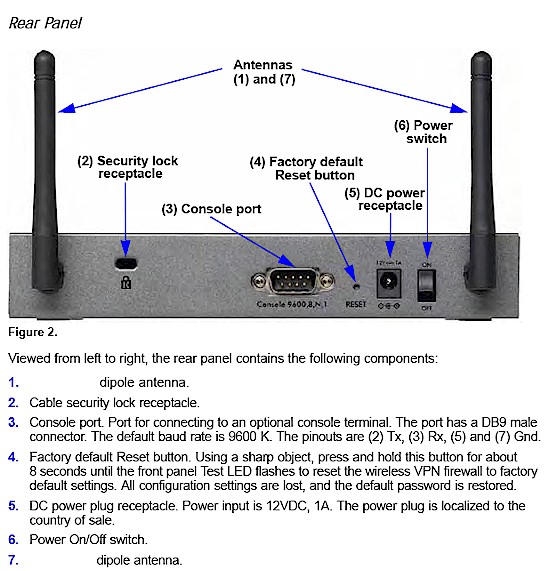
Physically, the 318N is identical to the 318G, with the addition of two wireless antennas in the back and a power switch. The power switch was omitted from the FVS318G, I’m glad it’s returned on the FVS318N. The device remains a desktop size at 7.5” wide by 4.9” deep by 1.4” high.

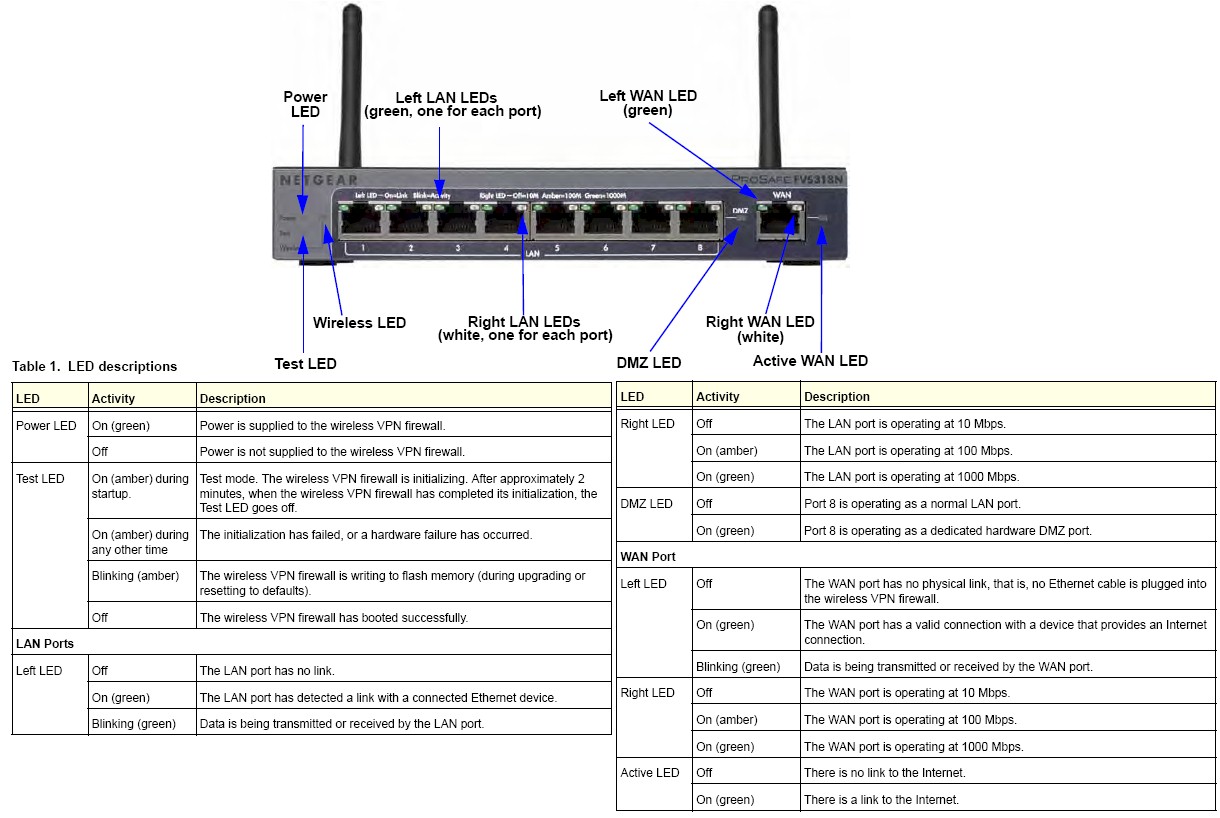
Figure 1: NETGEAR FVS318N Ports and LEDs
Front and back pictures with callouts are are shown in Figures 1 and 2.

Figure 2: NETGEAR FVS318N rear panel
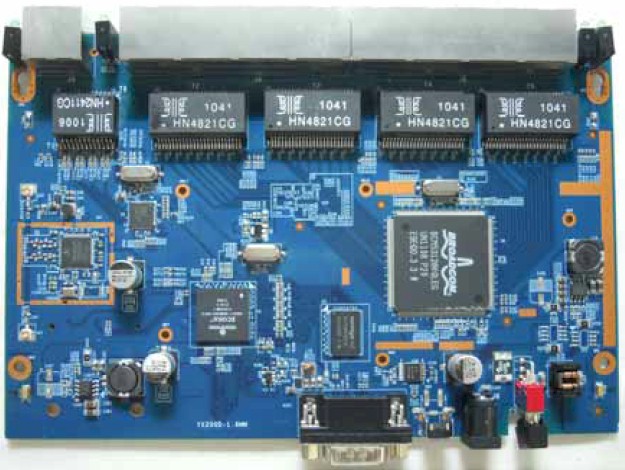
Inside the metal housing (Figure 3) the 318N has a 300 MHz Cavium CPU, 128 MB of RAM and 32 MB of flash. The processor and memory is a significant upgrade from the FVS318G, which had a 250 MHz processor, 32 MB of RAM and 8 MB of flash. The FVS318N is passively cooled, and thus silent.

Figure 3: NETGEAR FVS318N board
The goal of this review is to take a closer look at the 318N’s features and VPN performance. I’m going to focus on the upgrades to the LAN, new VPN options, touch on the wireless functionality, and conclude with performance measurements. You might want to read Tim’s New To the Charts article for routing and wireless performance tests.
Configuration
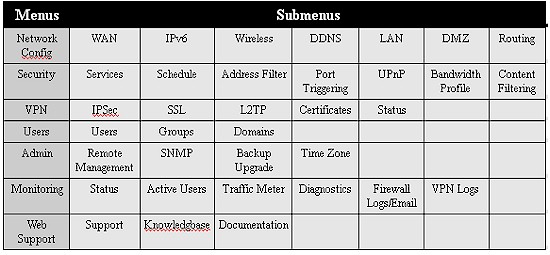
I find that examining menu options provides a high level overview of the functionality of a device. There are 8 main menus on the FVS318N. Each menu has 3-8 submenus. Within each submenu are tabs and links where configurations are applied or viewed. Table 1 shows the main menus in the far left column and their corresponding submenus.

Table 1: NETGEAR FVS318N menus
The menu structure of the FVS318N is easy to navigate. Figure 4 shows the Network Configuration selected from the top main menus in the orange bar, its seven submenus below, and three configuration tabs below that.

Figure 4: NETGEAR FVS318N menus structure
Menu responsiveness, however, is too slow. I found myself waiting for the menu to refresh when clicking from one option to another or applying configurations. Rebooting the router is also quite slow. It takes over 90 seconds for the device to become responsive, and another 1-2 minutes before the WAN port is back on line!
Feature Tour
When I reviewed the FVS318G, I ended saying “I must say again that NETGEAR missed an opportunity to make this product really outstanding on the LAN side. The 318G has 8 Gigabit LAN ports, so why not support jumbo frames and VLANs?”
It appears NETGEAR responded to my plea and the FVS318N supports both jumbo frames and VLANs! Obviously, these were the first two things I wanted to test.
Jumbo frames are enabled in the security menu, as shown in Figure 5. NETGEAR reports that the FVS318N will support up to 9720 byte frames. Interestingly, even without enabling jumbo frames, I noticed I could pass 1954 byte frames, which are technically jumbo frames. (For more details on jumbo frames, check out this article.)

Figure 5: Jumbo frame enable
I tested jumbo frames on the FVS318N with a PC and NAS that I have used to test jumbo frames on multiple devices. My test is simply sending pings of various frame sizes. On a Windows PC from the command line, type ping -f -l (frame size) (ip address), to send a ping with different frame sizes. For example, ping -f -l 2000 192.168.1.101 to send a 2000 byte frame to a device with the 192.168.1.101 address.
My initial tests of jumbo frames on the FVS318N failed, so I contacted NETGEAR to report my findings. NETGEAR engineering replied that jumbo frames on the FVS318N are only supported on ports 1-4. Silly me, I was using ports 6-7!
Using ports between 1 and 4 did allow jumbo frames, as shown in Figure 5. I was able to ping between my devices with frames up to 4046 bytes, which is my PC’s limit.

Figure 6: Jumbo frame ping gest
It’s good to see the enhancement of jumbo frame support to the LAN of the FVS318 series, but disappointing that only half the ports have the feature. According to NETGEAR, the chipset used on the device is the limitation.
VLAN
New to the FVS318 is support for VLANs. With 8 LAN ports, having the ability to separate connected hosts into different subnets is useful.
Each LAN port on the FVS318N can be assigned to one or more VLANs. By default, all ports are members of the default VLAN, which is VLAN 1. All traffic on the default VLAN is untagged. Ports on the FVS318N can be assigned to different default VLANs.
VLANs numbered 2-4093 can be created, but only 64 simultaneous VLANs can be configured at one time. A separate DHCP server can be enabled for each VLAN.
The manual states the FVS318N supports port based VLANs, yet it also supports VLAN trunking and tagging. If a port is assigned to two or more VLANs, that port performs as an 802.1q VLAN trunk, tagging all traffic except traffic on the port’s default VLAN.
I tested this function by creating VLAN 22 and making port 5 a member of VLAN 22. Port 5’s default VLAN remained VLAN 1. I enabled the DHCP server on VLAN 22 of the FVS318N with the 192.168.22.0/24 subnet.
I then connected port 5 on the FVS318N to port 5 on a NETGEAR GS108T switch configured for 802.1q VLAN tagging. I set port 5 on the NETGEAR GS108T to be an untagged member of VLAN 1 and a tagged member of VLAN 22. I then set port 6 of the GS108T to be an untagged member of VLAN 22.
With this configuration, a PC connected to port 6 of the GS108T received an IP address from VLAN 22, validating the FVS318N’s ability to trunk and tag. Figure 7 is a screen shot of my VLAN configuration on the FVS318N.

Figure 7: VLAN configuration
WLAN
Another update to the FVS318 series is the addition of a wireless access point in the FVS318N. The FVS318N has a single band 802.11b/g/n radio and can be configured to run four separate virtual access points (SSIDs). Configuration is separated into three tabs, one for the access points, another for profiles, and one for radio settings.
Each access point on the FVS318N is assigned to a specific VLAN, and can be enabled and disabled on a specific time schedule. MAC based security where devices can be allowed or blocked based on MAC address is also defined by access point.
Each access point is configured with a profile to define security parameters. Choices within profiles include broadcast or hidden SSID; Open, WEP, WPA, WPA2 and WEP+WPA2 security; and RADIUS server authentication.

Figure 8: WLAN configuration
The FVS318N’s radio has multiple options. It can run in b and g mode, g only, n and g mode, or n only. Channel spacing, Side Band Control, Channel, Transmit Power and Transmit Rate are all configurable.
I had no problem connecting a Windows 7 laptop with an Intel 6300 802.11n chip to the FVS318N and getting a signal throughout my house. The FVS318N has a useful status page that shows connected wireless devices as shown in Figure 8 below. Tim covered the FVS318N’s wireless performance here and the FVS318N is in the Router Chart database.
IPv6
Also new to the FVS318N is support for IPv6. The WAN port can run in IPv4 mode or IPv4/IPv6 (Dual Stack) mode. NETGEAR supports 6to4 and ISATAP Tunnels for sending IPv6 packets across IPv4 WANs. The WAN port can get its IPv6 address statically or via DCHP, using stateless or stateful auto configuration.
Similarly, the LAN side of the FVS318N can be configured to provide IPv6 addresses via stateless or stateful DHCPv6. However, the LAN side of the FVS318N only has the option for a single IPv6 VLAN. Note also that enabling IPv6 requires a reboot. Figure 9 is a look at the FVS318N’s LAN IPv6 options.

Figure 9: IPv6 config
Security
The FVS318N retains the FVS318G’s firewall functionality. so I’ll refer you to that review for more details on security. To summarize, the FVS318N is a three zone router, providing traffic filtering between the WAN, LAN and DMZ zones. Rules can be created to allow or block traffic flows based on time of day, it has an ALG function that can be turned on/off, supports UPnP, provides bandwidth management tools and can filter web traffic based on keywords or URLs.
VPN
The FVS318N supports four methods of VPN remote access: IPsec Site to Site, IPsec Client to Site, SSL Client to Site, and L2TP Client to Site connections. The FVS318N will support up to 12 IPsec tunnels and 5 SSL tunnels. NETGEAR’s documentation doesn’t specify the L2TP tunnel limit.
I was able to set up all four types of connections using a 64-bit Windows 7 PC and use them to establish a Remote Desktop Connection to a PC o the FVS318N’s LAN. I had no troubles with the first three VPN types, but had some challenges with the L2TP VPN connection.
I set up a Site to Site connection between the FVS318N and NETGEAR’s SRX5308. I used NETGEAR’s VPN wizard on both routers, which created a tunnel using 3DES encryption and SHA-1 authentication. Upon completing the wizard in both routers, the tunnel came right up.
The FVS318N supports Client to Site IPsec VPN tunnels with “optional software.” To test Client to Site IPsec connectivity, I used Greenbow’s IPsec client, a standards based IPsec software client. I set up the NETGEAR using the Client to Site VPN wizard, which used basically the same values as it did for the Site to Site connection, including 3DES encryption and SHA-1 authentication. With the NETGEAR and Greenbow configured, I was able to connect remotely to the FVS318N immediately. Figure 10 is a screen shot showing my active IPsec Site to Site and Client to Site VPN tunnels running simultaneously.

Figure 10: IPsec VPN tunnel status
I’ve had good results with NETGEAR’s SSL solution on several models, including the FVS336G and SRX5308. I had good results with NETGEAR’s SSL solution on the FVS318N as well. The FVS318N uses the same Virtual Passage interface and drivers for SSL VPN connectivity as the other NETGEAR routers, subsequently, I had no problems setting it up or connecting with my 64-bit Windows 7 PC.
Configuring an SSL VPN connection on the FVS318N is simply a matter of adding a user name and password in the user section of the manual, and specifying the user as an SSL VPN user. There is no wizard for SSL VPN connectivity, it isn’t needed.
By default, the VPN tunnel will run in Split Tunnel mode, which means the client will only send traffic destined for the FVS318N over the SSL VPN connection. Other traffic, such as the client’s Internet traffic, will not be routed over the SSL VPN connection unless you choose Full Tunnel mode. Below is a screen shot showing my active SSL Client to Site VPN tunnel.

Figure 11: SSL tunnel status
A useful option on the SSL configuration is to add routes to any VLANs you may have configured. By default, the FVS318N will provide connectivity to the default VLAN over the SSL VPN connection. If you want remote users to have network access to your created VLANs, just add the destination network as a configured client route. Figure 12 is a screen shot showing the previously created 192.168.22.0/24 VLAN added as a client route so it can be accessed over the SSL VPN connection.

Figure 12: Adding a VPN route
Configuring the FVS318N for L2TP VPN connections is just a few steps. Simply enable the server and specify a range of IP addresses for the L2TP users. My configurations are shown below.

Figure 13: L2TP server enable
Windows supports L2TP VPN connections without installing software, so all you have to do is configure it properly. The NETGEAR manual fails to provide guidance on the proper Windows settings, but NETGEAR provided a useful document (.docx) on how to set it up.
Setting up the L2TP adapter in Windows involves entering the FVS318N’s WAN IP, the user name and password you created on the FVS318N, and selecting L2TP with IPsec as the VPN type. The tricky part is you have to modify the Windows 7 registry to complete the configuration. Although the steps were easy, I don’t like having to mess with the registry in Windows.
With my configurations in place, I still couldn’t connect with an L2TP client. After some troubleshooting with NETGEAR, they suggested changing the range of IP addresses I configured on the FVS318N’s L2TP configuration page. I did so, and the connection worked. Below is a screen shot showing my active L2TP Client to Site VPN tunnel.

Figure 14: L2TP tunnel status
A couple days later, after testing various other features, I tried the L2TP connection again and it failed. I found I had to again change the range of IP addresses on the FVS318N’s L2TP configuration page to get it to work.
To summarize the FVS318N VPN capabilities, NETGEAR’s IPsec and SSL VPN solutions were stable and reliable, but NETGEAR’s L2TP solution needs more work. 64-bit Windows 7 is pretty common, and having to edit the registry on my PC, and then change IP ranges to get the server to work on the router is a hassle.
VPN Performance
I tested the FVS318N’s VPN performance with iperf using default TCP settings, with a TCP window size of 8 KB and no other options. I ran iperf on two PCs running 64-bit Windows 7 with their software firewall disabled. All tests were done over a Gigabit network. (Running a simple iperf throughput test between two PCs uses the command iperf -s on one PC and iperf -c (ip) on the other PC.)
Table 2 shows my VPN throughput measurements over the four various tunnel types on the FVS318N. The table is missing LAN-WAN throughput measurements on the SSL and L2TP connections as it seems the FVS318N either proxies or NATs the SSL and L2TP VPN connection to the remote client, preventing a direct LAN-WAN iperf connection.
|
Throughput Type |
WAN – LAN Throughput |
LAN-WAN Throughput |
|---|---|---|
| IPsec Site to Site | 33.1 | 45.8 |
| IPsec Client to Site | 13.6 | 19.2 |
| SSL Client to Site | 1.23 | ** |
| L2TP Client to Site | 4.31 | ** |
Table 2: VPN throughput summary
As you can see, the IPsec throughput on the FVS318N is greater than that of the SSL and L2TP connections. The SSL connection speed is the lowest, which is consistent with NETGEAR and Cisco routers using Cavium Processors and Virtual Passage SSL VPN technology.
I put together Table 3 comparing tunnel capacity and WAN-LAN VPN performance of the FVS318G, FVS318N, the Cisco RV120W and Cisco RV220W.
| FVS318N | FVS318G | RV120W | RV220W | |
|---|---|---|---|---|
| IPsec Tunnels | 12 | 5 | 10 | 25 |
| SSL Tunnels | 5 | 0 | 0 | 5 |
| PPTP/L2TP Tunnels | 5 L2TP | 0 | 0 | 10 PPTP |
| IPsec Mbps | 33.1 | 2.72 | 26.6 | 38.3 |
| SSL Mbps | 1.23 | – | – | 0.72 |
| PPTP/L2TP Mbps | 4.31 | – | – | 16.3 |
Table 3: VPN feature comparison
Clearly, the FVS318N has significantly better IPsec throughput than the FVS318G—over 10x faster! Further, the FVS318N exceeds both the VPN capacity and throughput of the Cisco RV120W.
Compared to the RV220W, the FVS318N falls short with IPsec capacity (12 tunnels vs. 25 tunnels) and performance with IPsec (33.1 Mbps vs. 38.3 Mbps), but is just a tad faster with SSL performance (1.23 Mbps vs. 0.72 Mbps).
Closing Thoughts
Table 4 summarizes key differences between the four routers. Note, NETGEAR reports the FVS318N has a capacity of 6000 maximum sessions. Tim measured only 25 max sessions, but didn’t get a chance to repeat his test before sending the device to me. I ran our max sessions test multiple times on the FVS318N and the best result I measured was 5004, a bit short of the spec, but an upgrade over its predecessor’s limit of 200 sessions.
| FVS318N | FVS318G | RV120W | RV220W | |
|---|---|---|---|---|
| Wireless Frequency Band | 2.4 GHz (single band) | – | 2.4 GHz (single band) | 2.4 GHz, 5 GHz (dual band) |
| LAN Ports | (8) 10/100/1000 | (8) 10/100/1000 | (4) 10/100 | (4) 10/100/1000 |
| Jumbo Frame Support | Y | N | N | Y |
| VLANs | 64 | 0 | 4 | 16 |
| WAN-LAN Throughput | 62.3 | 22.5 | 86.7 | 720 |
| LAN-WAN Throughput | 60.1 | 22.9 | 86.6 | 728.4 |
| Total Simultaneous Throughput | 60.8 | 25.8 | 136.3 | 1113.1 |
| Max Connections | 5004 | 200 | 12086 | 34925 |
| Price | $179.00 | $117.85 | $114.99 | $255.00 |
Table 4: VPN product comparison
The FVS318N is an upgrade across the board over the FVS318G. But Cisco’s RV120W provides stiffer competition. Wins for the FVS318N are its 8 Gigabit LAN ports with jumbo frames, support for more VLANs, faster IPsec performance, and more VPN tunnels including SSL. But the FVS318N falls short of the RV120W in Wireless performance, routing throughput and price. The FVS318N is also more expensive. The RV120W can be found on line for $115, while the FVS318N is up around its suggested list of $179.
Cisco’s RV220W ($255) is more expensive than the FVS318N with fewer LAN ports and VLANs. Yet it has higher VPN performance numbers and greater tunnel capacity plus better routing throughput. (I must also point out the RV220W has an problem with SSL VPN tunnels and 64-bit Windows 7.)
I like that NETGEAR followed my recommendation and added jumbo frames and VLAN capability to the FVS318N. Perhaps it wasn’t on my recommendation alone, but I’m taking credit for it anyway! In addition, I applaud NETGEAR’s addition of wireless N and SSL VPN connectivity.
Not to be overlooked, I also like the FVS318N’s 8 Gigabit LAN ports. I think that is an advantage over typical four-port devices. Sure, you can always add a switch for more ports in your LAN, but a switch is another device, another power brick and so forth.
The fact that jumbo frames are only supported on ports 1-4 is disappointing. NETGEAR states this is a chipset/hardware limitation, so firmware isn’t likely to resolve this problem in the future.
Findally, the FVS318N’s L2TP configuration on 64-bit Windows 7 renders it’s L2TP VPN connectivity useless for me. I’d stick with the SSL VPN tunnels for remote client connectivity. NETGEAR has a good track record with its SSL VPN support, going back to the FVS336G. I’d also like to see better menu performance. It’s painful waiting for a screen to refresh after a configuration.
At the end of the day, I recommend the FVS318N as I did the FVS318G before it, for many of the same reasons. The 318N accommodates a growing network with 8 Gigabit Ethernet ports, has a customizable firewall, provides usable VPN options, and now includes wireless and VLAN capability. And don’t forget, NETGEAR ProSafe devices have a lifetime warranty!
 Buy ProSafe Wireless-N 8-port Gigabit VPN Firewall from Amazon
