Introduction
Update 3/30/2012: Changes from TP-LINK feedback

| At a glance | |
|---|---|
| Product | TP-LINK 150Mbps Wireless N Mini Pocket Router (TL-WR700N) [Website] |
| Summary | Pocket-sized budget-friendly single-stream 2.4 GHz 802.11bgn AP, router, bridge, client, repeater |
| Pros | • Lots of modes • Wall-wart format • Decent documentation • Very inexpensive |
| Cons | • No WPS • Can’t use as wired router • Lower range than full-sized APs/routers |
Typical Price: $25 Buy From Amazon
I’m not sure of the market for wireless travel routers, given the wide availability of wireless access in hotels these days. But given the marketing push that TP-LINK is giving its TL-WR700N 150Mbps Wireless N Mini Pocket Router, at least they think there is one. However, the company is hedging its bet by also endowing its tiny wonder with wireless AP, bridge, repeater and client modes.
The 700N is about the size of the palm of your hand. Into this compact package, TP-LINK has crammed a reset switch, AC power supply, one 10/100 Mbps Ethernet port and a wireless indicator light. And, oh yeah, circuitry for the single-stream (150 Mbps maximum link rate) 802.11bgn functions, too.
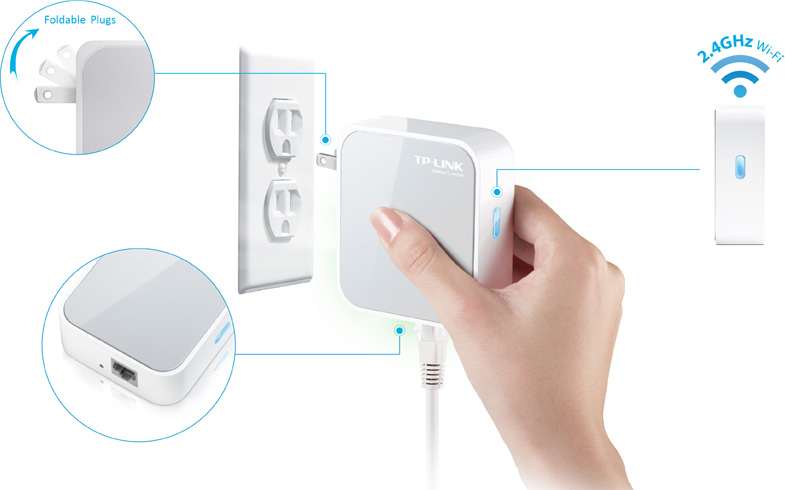
Figure 1: TP-LINK TL-WR700N connectors and ports
Inside
The heart of the 700N is an Atheros AR9331 SoC, which also includes the single-stream N 2.4 GHz radio. The photo in Figure 2 reveals 16 MB of RAM, but we couldn’t find the flash chip. As you can see, there isn’t much to it.
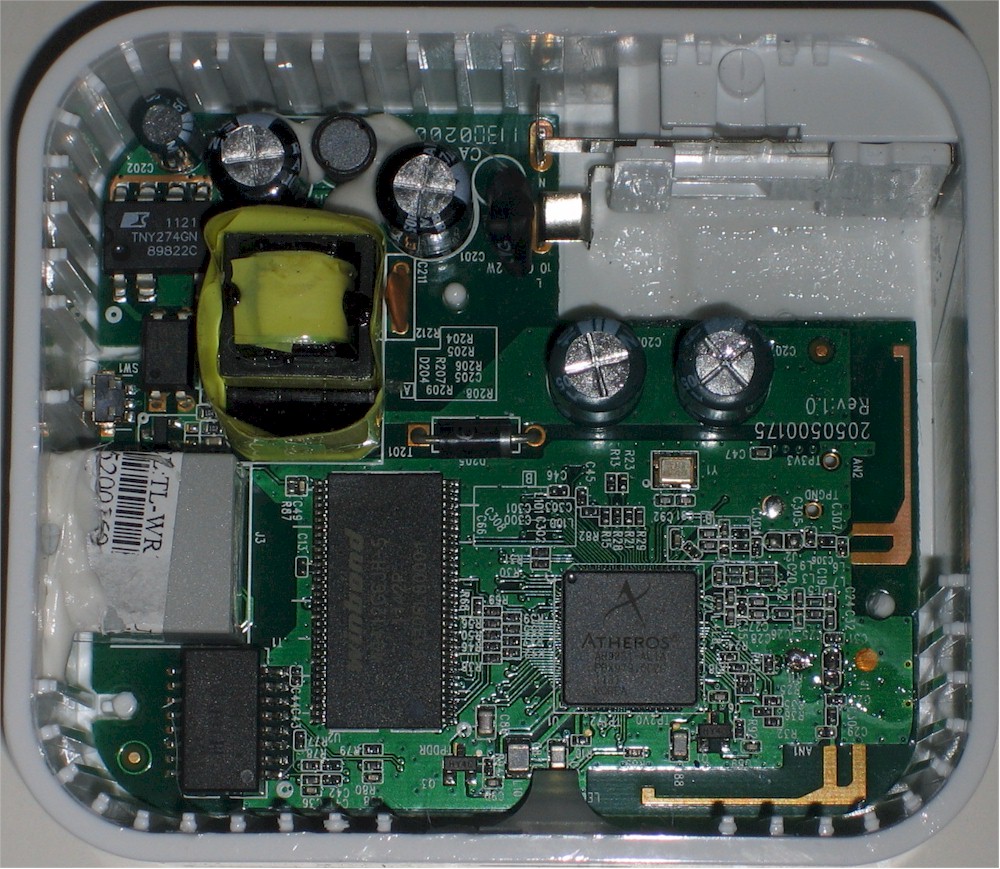
Figure 2: TP-LINK TL-WR700N internals
Features
Logging into the admin screen for the first time brings up the Quick Setup wizard (Figure 3) with five different options for setting up the TL-WR700N. These include AP (Access Point), Router, Repeater, Bridge, and Client modes. Each mode has its own set of configuration parameters, such as QoS that can be set only in Router mode. Note that you aren’t forced to change the admin password as part of setup.
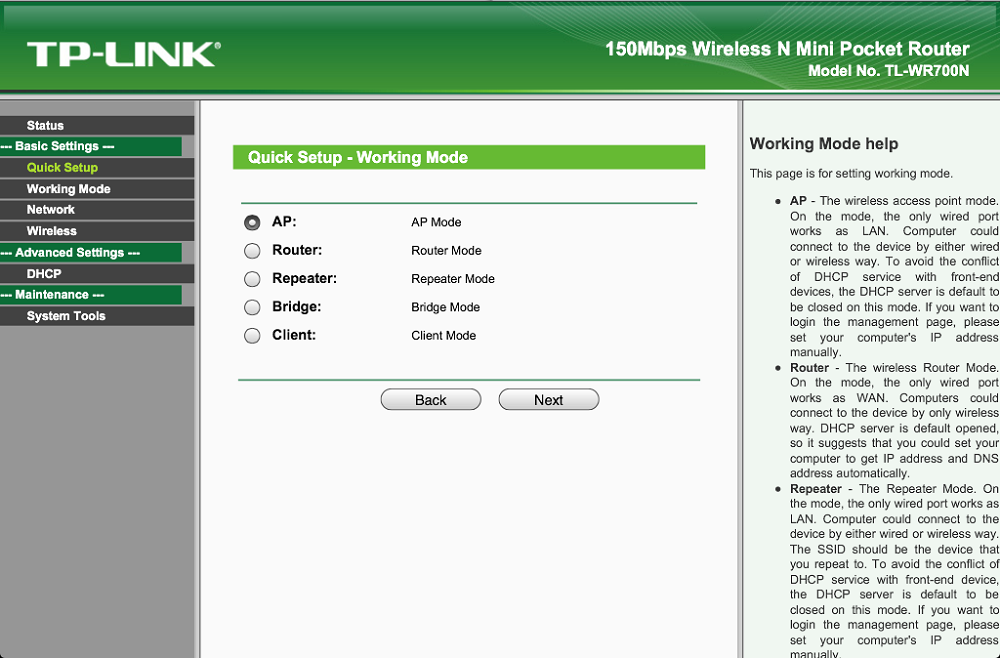
Figure 3: TP-LINK TL-WR700N modes
The different configuration options and its small size make the TL-WR700N a handy and inexpensive device for things like extending wireless coverage and connecting an Ethernet-only device to a wireless network.
It’s been mentioned many times here that repeating probably isn’t the best way to extend your wireless range. Repeating uses a single radio to receive and retransmit, so maximum possible bandwidth to a repeater-connected client is cut in half. For best throughput, the TL-WR700N should be connected to your LAN via Ethernet and configured as an AP. But when Ethernet isn’t available, a slow, repeated connection is better than none!
Curiously missing is WPS (Wireless Protected Setup). For such a wide variety of features packed into such a tiny shell, I was a little surprised that WPS was not supported. The lack of WPS is an indication that the 700N is not Wi-Fi Certified, since WPS support is a Certification requirement.
Despite its small package and lack of WPS support, the TP-LINK TL-WR700N has a nice set of features in an admin interface that is nicely laid out and user-friendly. While going through the TL-WR700N’s various admin screens, I really forgot that this was a sub-$30 router that could fit in the plam of my hand.
The features were everything you would expect in a router costing much more. Here’s a quick feature summary:
Routing
• DHCP Server, range setting, lease time setting, default gateway, primary and secondary DNS, and default domain
• DHCP Client list
• DHCP reservation
• Virtual Server entry for single or multiple ports with TCP, UDP or all protocols forwarded. Enable/disable for each entry. Some common applications provided.
• Port triggering – can set individual or range of incoming ports. Allows you to enable or disable TCP and UDP ports on network devices.
• DMZ Host
• UPnP enable/disable
• DDNS support for Dyndns (www.dyndns.org), Comexe (www.comexe.cn), Peanuthull (www.oray.net)
Security
• VPN Passthrough enable/disable for PPTP, L2TP and IPSec
• DoS (denial of service) enable/disable
• Enable UDP Flood filtering (with settable threshold)
• Enable TCP-SYN Flood attack filtering (with settable threshold)
• Ignore Ping Packet from WAN port
• Remote Management on WAN enable/disable
• MAC address filtering
• IP address filtering
• Domain filtering
• Internet access control – Rule based access control for host (domain name or IP address)
Wireless features
• AP, Router, Client, Bridge, and Repeater modes
• Auto and manual channel set
• SSID broadcast enable/disable
• Enable/disable wireless
• Beacon interval, RTS threshold, Fragmentation Threshold adjustments
• Wireless MAC address filtering (allow or deny based on MAC address)
• WMM disable
• Short GI disable
• Wireless modes: b-only, g-only, n-only, mixed b/g, mixed b/g/n (default)
• Channel width 20MHz/40MHz
• Transmit power adjust, High, Middle, Low
• Wireless network statistics, packets sent/received, active associated clients
Features – more
I must admit that I was a bit confused by the terminology used by TP-LINK to describe the 700N’s modes, particularly the difference between client and bridge modes. The Application page was very helpful in sorting this out, though. Here is a summary of the explanations found there, rephrased for clarity.
AP Mode (default)
Explanation: Used to add non-routed wireless capability to a wired network. The TL-WR700N’s Ethernet port is connected to a wired network; DHCP and routing is provided by the host network router.
Client Mode
Explanation: Use this mode to connect Ethernet-only devices to a wireless network. By connecting the 700N’s single Ethernet port to a switch, multiple devices can be connected. This is usually called a wireless bridge (or wireless-to-Ethernet bridge). This mode does not use WDS.
Repeater Mode
Explanation: Same as the standard definition. Used to extend wireless LAN range with devices using the same network name (SSID) and security. Ethernet port is not used.
Update 3/30/2012
Bridge Mode
Explanation: Think of this mode as acting as a wireless router with both WAN and LAN wireless connections. You might use this mode to connect to hotel or other hotspot wireless, then connect multiple wireless devices on a private, NAT-firewalled network. Ethernet port is not used.
This mode provides a WDS-based repeated connection back to a main router/AP. This mode differs from Repeater mode in that the repeated network has its own SSID and wireless encryption. However, wireless traffic is not kept separate from the main network clients.
Router Mode
Explanation: The TL-WR700N’s Ethernet port is connected to a DSL or cable modem and acts as a wireless router. DHCP, routing and NAT firewall are provided by the 700N.
You can find screenshots for each of the modes in the gallery below.

The TL-WR700N Working Modes Screen shows the modes which are available.

The TL-WR700N Wireless AP Setup screen allows you to configure the device as a wireless access point.

The TL-WR700N bridge setup screen allows you to configure the device as a different SSID bridging to the main SSID.

The TL-WR700N Wireless Repeater Screen allows you to configure the device as a wireless repeater.

The TL-WR700N DHCP settings screen allows many options for the DHCP server.

The TL-WR700N DHCP reservations allows you to reserve an IP address by MAC address.

The TL-WR700N Diagnostic Tools screen allows you to do the standard ping and traceroute diagnostic tasks.

The TL-WR700N Firmware Upgrade screen shows current firmware version and allows you to upgrade.

The TL-WR700N System Log screen can provide valuable logging information.
In Use
I checked each of the modes to be sure they worked. I found that going through the Quick Setup gave me the most success when changing modes. The Quick Setup screens walked through the configuration changes needed before rebooting. Going to the Modes screen to change modes would simply ask for a reboot without setting any parameters, often leaving the device in an unknown state.
I found Repeater mode a bit short on range. My iPad showed a strong signal from the 700N. However, the connection to the base router just two rooms away would randomly be lost and moving the 700N closer to the router resulted in a more stable connection. Maybe this shouldn’t be surprising, given the 700N’s small size and cheap price. But if a product can’t keep you connected, then it’s not worth buying no matter how inexpensive it is!
In Bridge mode I found that the SSID was not broadcast, even though I had enabled that option. It was obvious to see which network was the bridge I had set up, however, and once I entered the SSID it connected fine.
Client mode worked fine and is probably one of the better uses for the product.
Routing Performance
Because the the TL-WR700N only has one wired ethernet port, our normal (wired) routing tests could not be performed.
Wireless Performance
Testing by Tim Higgins
The TL-WR700N is not Wi-Fi Certified and improperly defaulted to auto channel width mode on power up. Firmware v4.18.16 Build 110810 Rel.69972n was used for testing. All tests were run on a WPA2-PSK secured connection using the four-location wireless test process with the product set to our test standard Channel 1 and in its default AP (access point) mode.
The throughput ranking in Figure 4 has been filtered to show 2.4 GHz-only wireless products. Because of its many modes and the fact that it does not perform wired routing, we’ve included the TL-WR700N in our Wireless Charts, not our Router Charts.
The chart shows the TL-WR700N ranking about middle of the pack for the average of all locations. Keep in mind that the 700N is a single-stream N router (150 Mbps maximum link rate), while all the other devices in the chart are two stream (300 Mbps maximum link rate). Average 2.4 GHz downlink throughput was 33 Mbps, while uplink throughput was 27 Mbps.
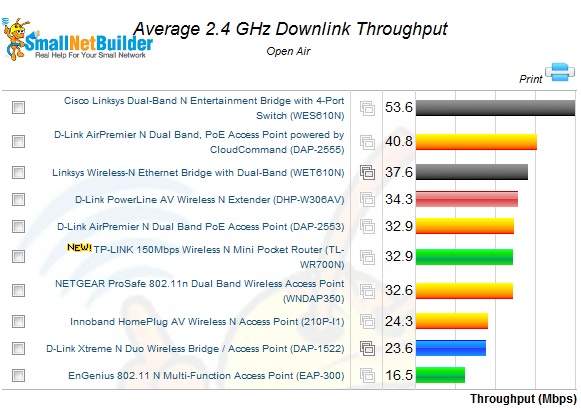
Figure 4: Average 2.4 GHz Downlink Throughput ranking – 2.4 GHz only wireless
Interestingly enough, 40 MHz wide mode made almost no difference in throughput, and actually was slower for uplink, with average downlink throughput of 35 Mbps and uplink throughput of 27 Mbps. Running simultaneous up and downlink tests did boost total throughput, yielding 50 Mbps in 20 MHz bandwidth mode and a surprisingly high 91 Mbps in 40 MHz mode.
The Performance Table in Figure 5 shows that we were not able to run tests in our lowest signal level test location F. Although the test client was able to remain connected, throughput was too low to start or run the IxChariot test. Surprisingly, we were able to run Location F tests with the product set to 40 MHz mode. But you can see that the sub-1 Mbps throughput is barely usable.
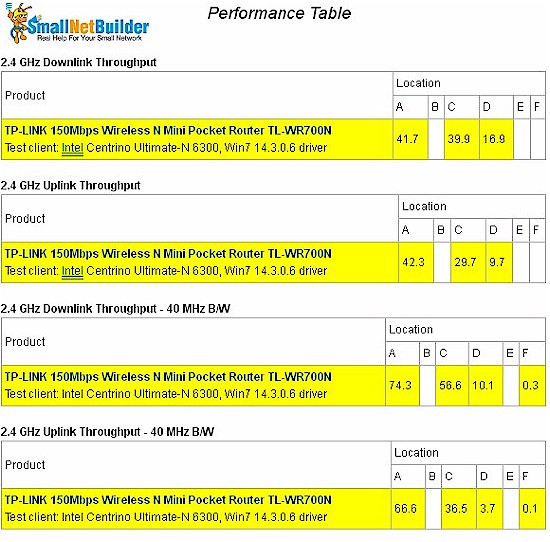
Figure 5: Wireless Performance Table
The IxChariot plot in Figure 6 shows some link rate shifing at the start of the location A and C tests that helped to hold down the total throughput numbers. I reran the tests a few times to see if I could eliminate this effect, but could not.
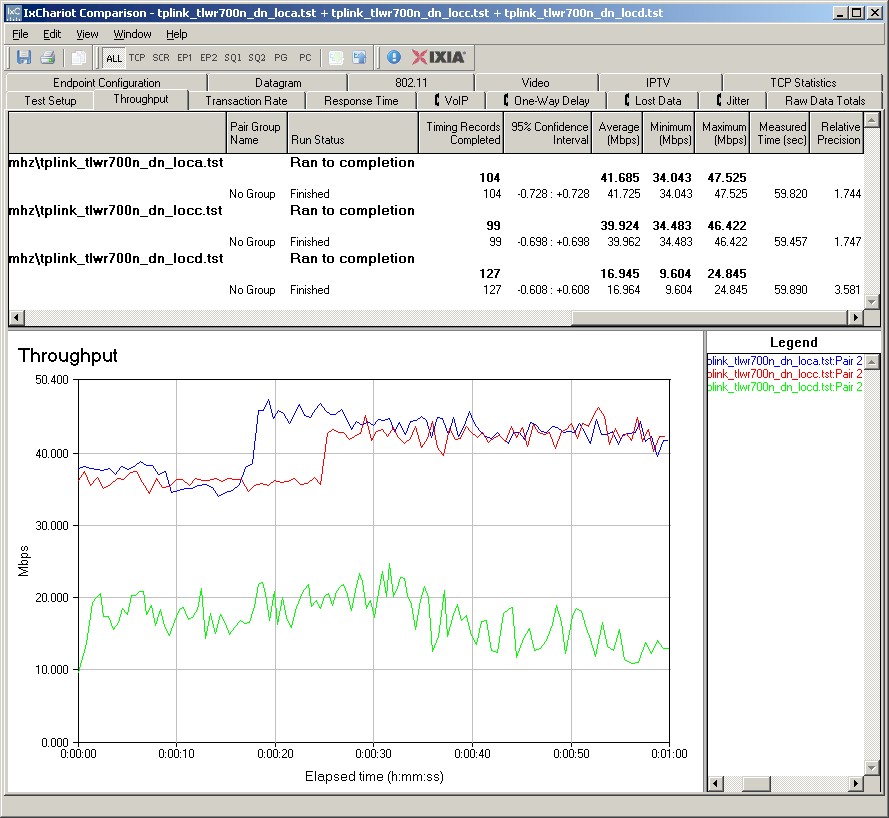
Figure 6: TL-WR700N 20MHz downlink IxChariot summary
The other plots linked below show this rate-shift effect only occasionally.
- 2.4 GHz / 20 MHz uplink
- 2.4 GHz / 20 MHz up and downlink
- 2.4 GHz / 40 MHz downlink
- 2.4 GHz / 40 MHz uplink
- 2.4 GHz / 40 MHz up and downlink
Closing Thoughts
The TP-LINK TL-WR700N is certainly priced attractively at around $30 and comes packed with features that you usually get only in higher-priced products. Its small size, integrated power supply and wall-wart form-factor make it attractive as an inconspicuous way to wirelessly bridge internet access to an Ethernet-less entertainment center or add a second access point to a remote location where you have an Ethernet port.
Its main weakness, however, is its range. In repeater mode especially, I had a hard time maintaining a stable connection between the product and my base router that was located only two rooms away. Switching to "client" mode over the same distance resulted in a solid connection, however. Based on my experience, using the TL-WR700N in this way, i.e. "Client" mode, will probably result in your highest satisfaction with it.
